
As technology evolves, smartphones have now become an essential part of our daily lives. They enable us to stay connected with the world, work remotely, and even record our memories through pictures and videos.
In addition, they come equipped with advanced features, such as a microphone, that allow us to make calls, record audio, and interact with various applications. However, despite their numerous capabilities, some users may find it challenging to turn on the microphone on their Android devices.
If you’re among those users, don’t worry, as we’re here to help. In this comprehensive guide, I’ll show you how to turn on your microphone on Android devices.
First, Check Your Microphone Hardware
Before diving into the software settings, it’s essential to make sure that your microphone hardware is working correctly.
Sometimes, the issue may be with the microphone itself, rather than the software settings. You can easily check whether your microphone hardware is functioning by following these steps:
- Open the voice recorder app on your device.
- Simply tap the “record” button and start speaking into the microphone.
After recording your voice, play back the recording and listen for any sounds.
If you can hear your voice clearly, then the hardware is working fine. However, if you can’t hear anything, it’s advisable to seek professional assistance to fix your device.
How to Turn on Microphone on Android Devices? (Step-by-Step Instruction)
If the microphone hardware is functioning correctly, but you’re still unable to use it, it’s time to check the software settings. Here’s how you can turn on your microphone on an Android device:
Step 1: Start by opening your device’s ‘Settings’ app.
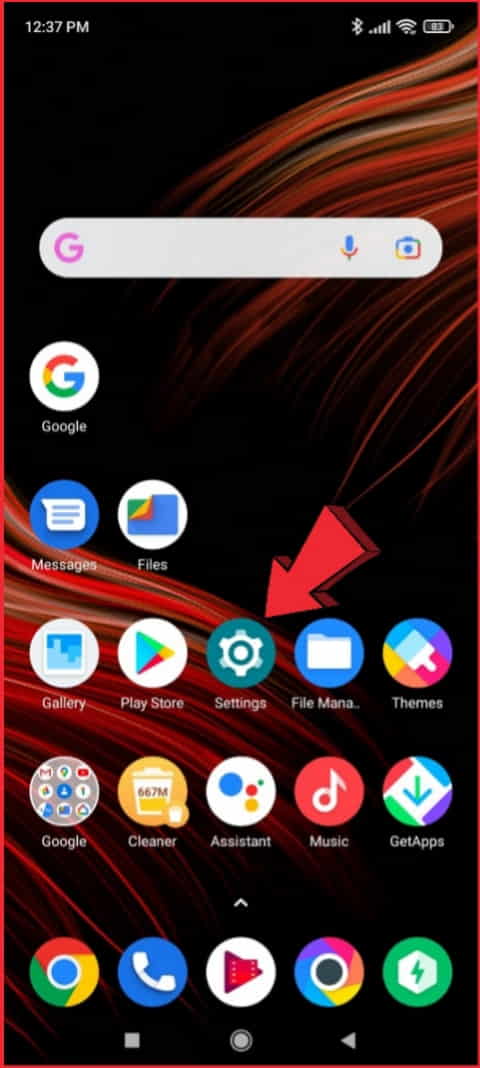
Step 2: Scroll down and tap on the ‘Apps and Notifications option.
Step 3: Locate the app you want to use the microphone with and select it.
Step 4: Tap on the ‘Permissions’ option and ensure that the ‘Microphone’ option is enabled.
Upload an image file, pick one from your media library, or add one with a URL.
Step 5: If it’s already enabled, but you’re still experiencing issues, try turning it off and on again.
Additionally, you can also enable or disable the microphone for all apps at once by following these steps:
Step 1: Open the ‘Settings’ app on your device.
Step 2: Scroll down and tap on the ‘Apps and Notifications option.
Step 3: Tap on the ‘Advanced’ option.
Step 4: Tap on the ‘App Permissions’ option.
Step 5: Scroll down and locate the ‘Microphone’ option.
Step 6: Toggle the switch to enable or disable the microphone for all apps at once.
If you’re still having issues with your microphone, try restarting your device or clearing the cache and data of the app you’re experiencing the problem with.
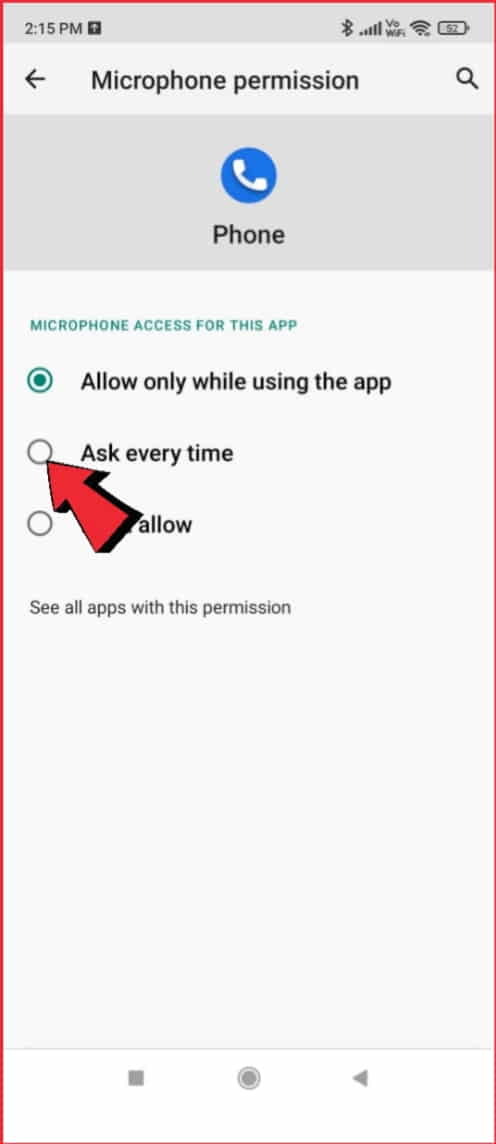
How to Enable Microphone Permissions for Specific Apps on Android?
Enabling microphone permissions for specific apps on Android is a crucial step in ensuring that you can use voice-controlled features, make phone calls, or record audio within the apps you use. To grant microphone permissions to specific apps, follow these steps:
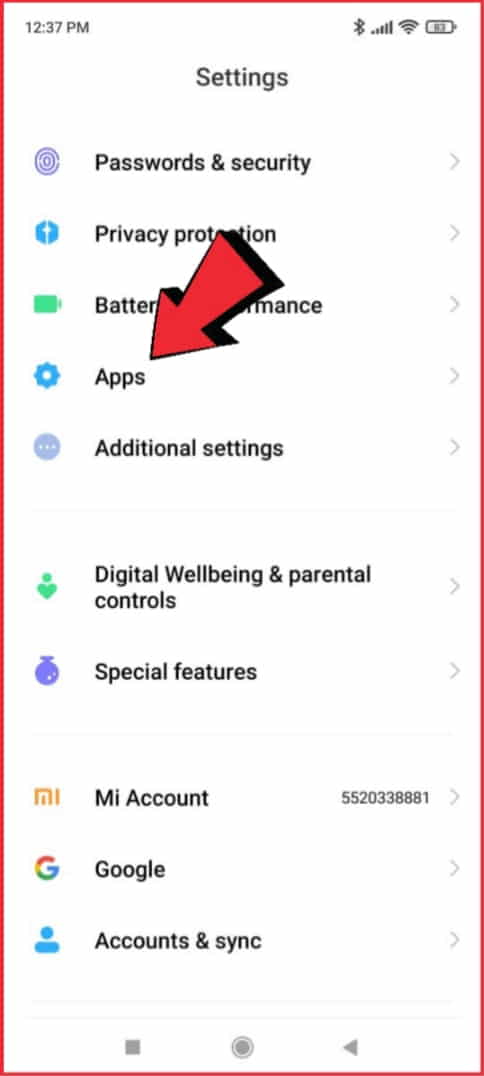
Step 1: Open the Settings app on your Smartphone. You can locate it on your main screen.
Step 2: Scroll down and find the “Apps” or “Applications” option. The name may vary slightly depending on your device.
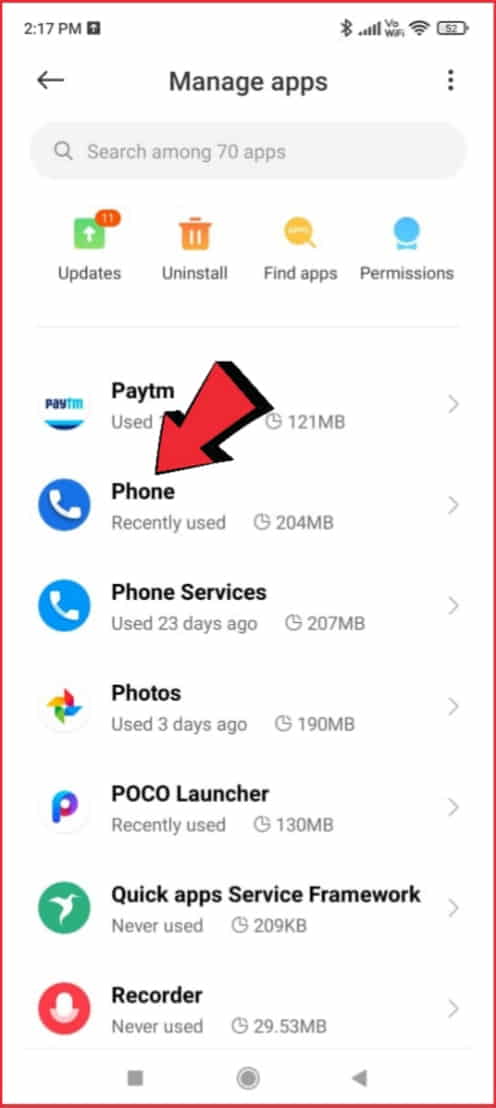
Step 3: Find the app that you want to grant microphone permissions to and tap on it.
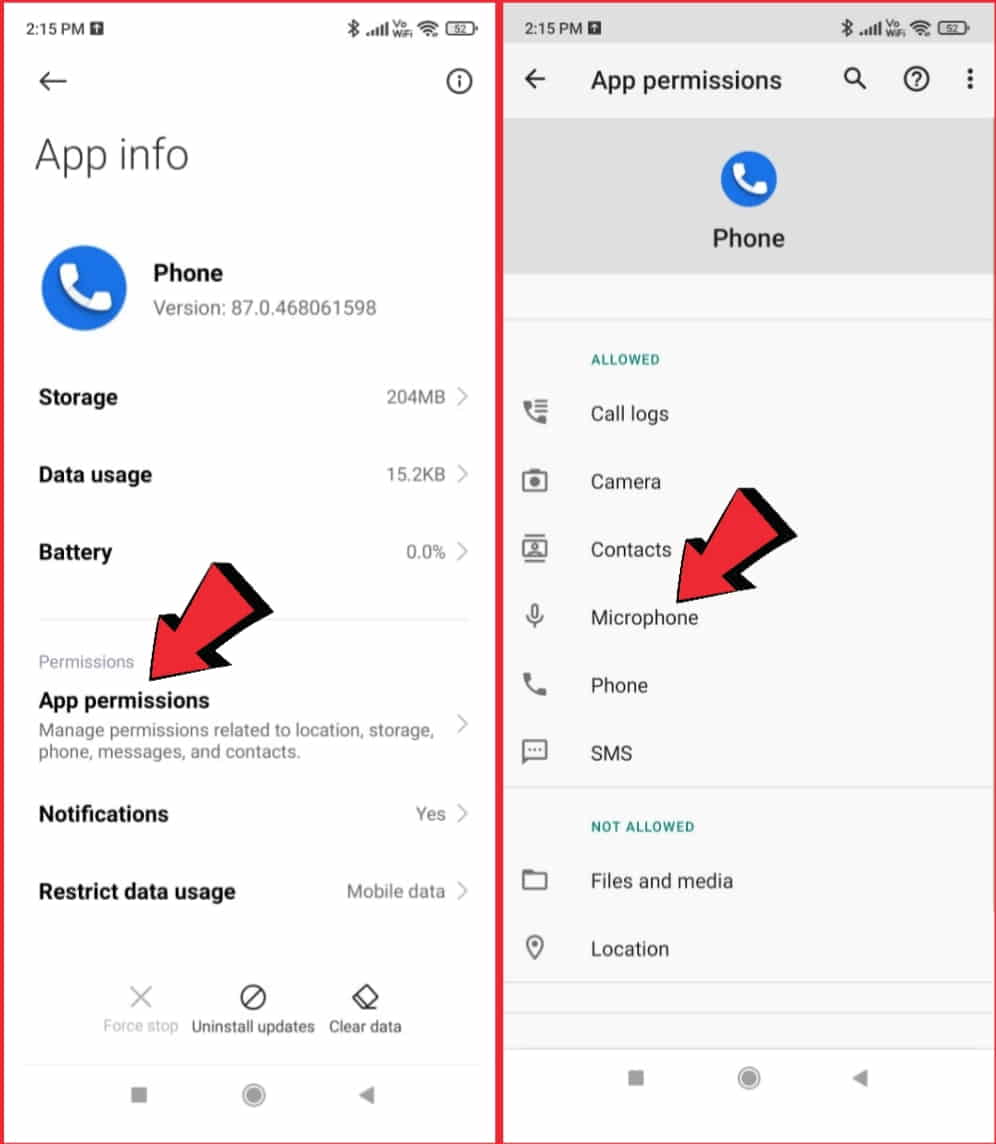
Step 4: Tap on “Permissions” or “App Permissions” depending on your device.
Step 5: Look for the “Microphone” option and tap on it.
Step 6: Make sure the switch next to the microphone option is turned on.
Step 7: If you see a prompt asking for your permission to access the microphone, tap “Allow” to grant the app access.
Step 8: If you don’t see a prompt, exit the app and reopen it. The app should now have microphone permissions.
Step 9: Repeat these steps for any other apps to that you want to grant microphone permissions.
It’s worth noting that not all apps require microphone permissions, and granting permissions to apps that don’t need them can be a potential privacy risk.
Be sure to carefully consider which apps you grant access to your microphone and review your app permissions regularly to ensure your privacy and security.
How to Disable the Microphone on Your Android Device?
Disabling the microphone on your Android device can be a useful security measure to protect your privacy. Here are the steps to disable the microphone on your Android device:
Step 1: Open the Settings option on your Android smartphone. You can locate it on the home screen of the smartphone.
Step 2: Scroll down and find the “Apps” or “Applications” option. The name may vary slightly depending on your device.
Step 3: Find the app that you want to disable the microphone for and tap on it.
Step 4: Tap on “Permissions” or “App Permissions” depending on your device.
Step 5: Look for the “Microphone” option and tap on it.
Step 6: Toggle the switch next to the microphone option to the “off” position.
Step 7: If you are prompted to confirm your choice, tap “Disable” or “Deny” to prevent the app from accessing your microphone.
Step 8: Repeat these steps for any other apps that you want to disable the microphone for.
It’s important to note that disabling the microphone may affect the functionality of some apps, such as those that rely on voice commands or require audio recording.
Also, some apps may still be able to access your microphone even if you disable microphone permissions, so it’s important to carefully review app permissions and settings to ensure your privacy and security.
How to Use Third-party Microphone Apps on Android Phones?
Using third-party microphone apps on Android devices can help you access advanced features and settings that may not be available in the default microphone app.
Here are the steps to use third-party microphone apps on Android devices:
Step 1: Go to the Google Play Store on your Android device and search for “microphone apps.”
Step 2: Browse the list of available microphone apps and read reviews and descriptions to find one that suits your needs.
Step 3: Download and install the app on your Android device.
Step 4: Open the app and grant the necessary permissions. These permissions may include access to your microphone, storage, and device settings.
Step 5: Follow the instructions provided by the app to adjust the settings and features to your preferences. These may include adjusting the recording quality, adding filters and effects, and setting up a recording schedule.
Step 6: Once you have configured the app settings, you can start using the microphone to record audio or use it for other purposes.
It’s important to note that some third-party microphone apps may not work properly on all Android devices.
Additionally, using third-party apps may also pose a security risk, so be sure to carefully review the app’s permissions and settings before using it.
How to Test the Microphone on Your Android Smartphone?
Testing the microphone on your Android device can help you ensure that it is working properly and that you can use voice-controlled features or record audio without issues.
Here are the Steps to Test the Microphone on your Android Device:
- Open the “Settings” app on your Android device.
- Scroll down and select “System” or “Device”.
- Select “Advanced” or “Additional settings”, depending on your device.
- Tap on “Accessibility” or “Accessibility settings”.
- Select “Hearing” or “Audio”.
- Look for the “Microphone” option and tap on it.
- Tap the “Test” button to start the microphone test.
Speak into the microphone and check if the audio level indicator moves. If the audio level indicator moves, the microphone is working properly.
If you don’t see the audio level indicator move, make sure the microphone is not blocked by a case or cover, and that there is no debris or dust in the microphone port. You can also try restarting your device and repeating the test.
If the microphone still doesn’t work, you may need to contact the manufacturer or a repair center for assistance.
It’s important to note that some Android devices may have different methods for testing the microphone, and the exact location of the microphone settings may vary depending on the device and operating system version.
How to Fix Microphone Problems on Android After a Software Update?
If your Android device is experiencing microphone problems after a recent update, there are a few steps you can take to try and fix the issue. Here’s what you can do:
- Restart your device. Sometimes a simple restart can fix microphone problems caused by software updates.
- Check for app updates. App updates can sometimes fix issues with microphone compatibility and performance.
- Check for system updates. System updates can also include bug fixes and improvements that may address microphone problems.
- Check app permissions. Make sure that the apps you want to use with the microphone have the necessary permissions to access them. You can check app permissions in the Settings app.
- Clear app cache and data. Sometimes app cache and data can cause microphone problems. You can clear app cache and data by going to Settings > Apps > [App name] > Storage > Clear cache/Clear data.
- Reset app preferences. Resetting app preferences can help fix issues with app permissions. You can reset app preferences by going to Settings > Apps > 3-dot menu > Reset app preferences.
Check for physical damage. If none of the above steps work, it’s possible that there is physical damage to the microphone or the device’s hardware. You may need to contact the manufacturer or a repair center for assistance.
Similar guide: How do you text someone if you don’t have their number? This is so simple than you think.
How to Use External Microphones with your Android Device?
Using an external microphone with your Android device can help you improve the quality of your audio recordings, videos, and calls. Here’s how you can use external microphones with your Android device:
Choose an external microphone that is compatible with your Android device. Most external microphones use a 3.5mm jack or USB connection. Some microphones may also require an adapter to connect to your Android device.
Connect the external microphone to your Android device. If you are using a 3.5mm jack, plug it into the headphone jack on your device. If you are using a USB microphone, connect it to the USB port on your device. If you need an adapter, connect it to the microphone first and then connect the adapter to your device.
Grant microphone permissions. Once the external microphone is connected, your device should automatically recognize it. However, you may need to grant microphone permissions to the app you want to use the microphone with. To do this, go to Settings > Apps > [App name] > Permissions > Microphone and turn on the permission toggle.
Choose the external microphone as the default input device. Some apps may automatically use the external microphone as the input device, but others may require you to choose it manually. To do this, go to Settings > Sound > Input device and select the external microphone.
Test the external microphone. To make sure that the external microphone is working properly, test it by recording a voice memo or making a call using the app you want to use it with. If the audio quality is good and the microphone is picking up sound, it’s working properly.
It’s important to note that not all Android devices are compatible with external microphones, and the compatibility may vary depending on the device model and operating system version. Additionally, some apps may not support external microphones or may require additional settings to work properly.
How to Improve Microphone Quality on Android Phones?
The microphone quality on your Android device can affect the clarity of your voice recordings, videos, and calls. If you’re looking to improve microphone quality on your Android device, here are some tips you can try:
- Clean the microphone port. Sometimes dust or debris can block the microphone port and affect sound quality. You can use a soft-bristled brush or a toothbrush to gently clean the port.
- Remove protective cases or covers. Some protective cases or covers can block the microphone port, which can affect sound quality. Removing the case or cover can help improve the microphone quality.
- Use an external microphone. External microphones can provide better sound quality than the built-in microphone on your device. You can choose from a variety of external microphones that are compatible with your device, such as lavalier, shotgun, or USB microphones.
- Use a recording app. Some recording apps have features that can improve microphone quality, such as noise reduction or equalization. You can try using apps like RecForge II or WaveEditor for Android.
- Adjust microphone settings. You can try adjusting the microphone settings on your device to improve sound quality. Go to Settings > Sound > Microphone and try adjusting the microphone gain, sensitivity, or noise reduction settings.
- Upgrade your device’s software. Sometimes software updates can improve microphone performance and fix bugs that affect sound quality.
- Check for physical damage. If none of the above steps work, it’s possible that there is physical damage to the microphone or the device’s hardware. You may need to contact the manufacturer or a repair center for assistance.
It’s worth noting that microphone quality can also be affected by external factors, such as background noise or the distance between the microphone and the sound source. Using these tips can help improve microphone quality, but there is no guarantee that they will completely eliminate all sound issues.
FAQs
Why can’t I turn on my microphone on Android?
If you’re having trouble turning on your microphone on Android, it could be due to hardware or software issues. First, check that your microphone hardware is functioning correctly by using the voice recorder app on your device. If the hardware is working correctly, but you’re still having issues, try checking the software settings or restarting your device.
How do I turn on the microphone on my Android device?
To turn on the microphone on an Android device, start by opening the ‘Settings’ app and scrolling down to ‘Apps and Notifications.’ Locate the app you want to use the microphone with and select it. Tap on the ‘Permissions’ option and ensure that the ‘Microphone’ option is enabled. If it’s already enabled, try to turn it off again.
What do I do if my microphone is not working on Android?
If your microphone is not working on Android, try restarting your device or clearing the cache and data of the app you’re experiencing issues with. If the issue persists, seek professional assistance to fix your device.
Can I disable the microphone on my Android device?
Yes, you can disable the microphone on your Android device by following the steps outlined in the article. Open the ‘Settings’ app and scroll down to ‘Apps and Notifications.’ Tap on ‘Advanced,’ then ‘App Permissions,’ and toggle the switch to disable the microphone for all apps at once.
How can I test my microphone on Android?
To test your microphone on Android, open the voice recorder app on your device, tap the record button, and speak into the microphone. After recording your voice, play back the recording and listen for any sounds. If you can hear your voice clearly, then the hardware is working fine.
Conclusion
In this guide, we’ve shown you how to turn on the microphone on Android devices. By following these steps, you can easily ensure that your microphone is working correctly and start enjoying all the features your device has to offer.
Remember, always ensure that your microphone hardware is functioning correctly before checking the software settings.
If you’re still having issues, try restarting your device or seeking professional assistance.